How to Install Genius Wefts: Step-by-Step Guide
Whether you’re a professional hairstylist or a DIY hair enthusiast, installing hair extensions can be both exciting and intimidating. Finding a method that offers natural looking results, comfort, and durability is often a challenge, especially when dealing with fine, sensitive, or uneven natural hair. That’s where Genialer Schuss Haarverlängerungen come in. Known for their ultra thin design, cuttable wefts, and versatility, Genius Wefts make achieving salon-quality hair at home or in a professional setting easier than ever.
For many people, the thought of adding volume and length without worrying about bulky seams or discomfort seems impossible. Traditional machine wefts or tape-ins can feel heavy, show visible lines, or require precise handling to avoid damage. Genius Wefts solve these common hair extension problems by offering a seamless, lightweight solution that can be customized for any hair type or style. In this guide, we’ll walk you through the step by step process of installing Genius Wefts, including different methods, tips for blending and styling, and expert tricks to ensure your extensions look flawless and natural.
By the end of this guide, you’ll have all the tools and knowledge needed to confidently install Genius Wefts and create a professional, natural-looking finish that lasts.

Understanding Genius Wefts and Their Benefits
Before diving into installation, it’s important to understand why Genius Weft extensions are so popular. Unlike traditional machine wefts or hand-tied extensions, Genius Wefts combine the best features of multiple hair extension types into a single product.
- Ultra-thin and lightweight: These extensions lay flat against the scalp and avoid bulk, making them ideal for fine or sensitive hair.
- Cuttable and customizable: You can trim the weft to fit any section without worrying about fraying.
- No return hair: Unlike hand-tied wefts, Genius Wefts eliminate short “beard” hairs that can irritate the scalp.
- Versatile installation methods: Suitable for sewing, microbeads, or tape-in applications.
Using Genius Wefts can help stylists and DIY users achieve volume, length, and a natural look while maintaining comfort and durability. They are designed to be blended seamlessly with your natural hair, making them perfect for a wide range of hairstyles, from layered cuts to long flowing waves.
Preparing Your Hair for Genialer Schuss Installation
Preparation is key to a flawless Genius Weft install. The steps you take before installation can affect how natural the extensions look and how long they last.
- Wash and condition your hair: Use a gentle, sulfate-free shampoo. Avoid applying conditioner near the roots, as this can make the beads or tape slip.
- Gründlich entwirren: Brush through your hair to remove knots and tangles. Use a wide-tooth comb or a loop brush to prevent breakage.
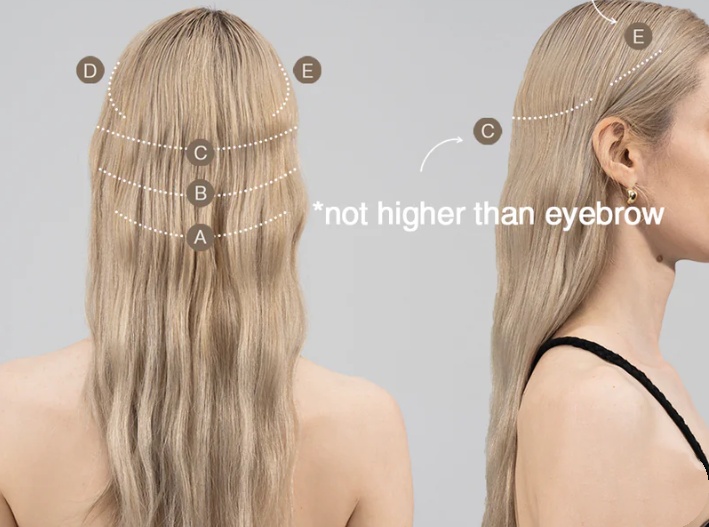
- Section your hair: Start at the nape and work upward, clipping the top sections away to create clear working areas. Horizontal parting ensures even placement of wefts.
- Trim or layer natural hair if needed: To prevent bulk and create a seamless blend, consider trimming your natural hair to shoulder length or adding subtle layers at the ends.
Proper preparation ensures that your wefts sit flat, blend seamlessly, and stay in place for longer periods, making maintenance easier down the line.
Method 1: Sewing Genius Wefts (Beaded Row Installation)
Die sew-in method is one of the most secure ways to install Genius Wefts, providing long lasting results without glue or tape.
Steps for Sew-In Installation:
- Create a beaded foundation: Use a looping tool to thread small sections of natural hair through silicone-lined microbeads. Clamp each bead close to the scalp.
- Measure and cut the weft: Genius Wefts can be trimmed anywhere along the spine without fraying.
- Sew the weft onto the beads: Using a curved needle and weaving thread, stitch the weft securely to the beads. Double stitch the ends for added durability.
- Repeat across the head: Continue adding rows until you achieve the desired volume and length.
Pro Tips:
Avoid placing beads too close to the hairline for a natural finish.
Keep tension consistent to prevent discomfort or breakage.
Space the rows evenly for balanced weight distribution.
This method is ideal for clients or users looking for a durable, salon quality finish that can last several weeks with proper care.
Method 2: Microbead Installation (No Sewing)
For a low-tension, flexible option, the microbead method is a popular alternative. This method skips sewing and secures the wefts with beads alone.
Steps for Microbead Installation:
- Divide hair into small rows: Leave the top layer to cover beads and wefts.
- Insert beads through natural hair: Use a bead threader to pull small sections of hair through silicone-lined beads and slide them close to the scalp.
- Attach the weft: Position the weft under natural hair and clamp the bead to lock it in place.
- Repeat and blend: Continue evenly across the head. Use scissors or heat tools to blend extensions with natural hair.
Benefits:
- Gentle on fine or sensitive hair
- Flexible and adjustable placement
- No sewing required, which reduces installation time
Method 3: Tape-In Genius Wefts
Erweiterungen mit Klebeband combine the flat finish of tape-ins with the customization of Genius Wefts. Some wefts come pre-taped, or you can add professional-grade extension tape to the top edge.
Steps for Tape-In Installation:
- Section the hair into small horizontal layers.
- Peel the backing from the tape and press the weft under a thin section of natural hair.
- Apply a second weft above to “sandwich” the natural hair.
- Press firmly and avoid washing for 48 hours after installation.
Benefits:
- Quick application
- Flat, seamless finish
- Customizable placement for layering and styling
Profi-Tipp: Always use high quality, medical grade tape for longer wear and minimal slippage.

Blending and Styling Genius Wefts
After installation, blending is essential to create a natural, salon-quality look.
Release upper sections of hair to cover the wefts.
Use scissors, razors, or heat tools to layer and blend extensions with your natural hair.
Consider the double-weft hidden beads technique to fully conceal bead rows for versatile styling.
Blending ensures the extensions integrate seamlessly with your natural hair, making them virtually undetectable and enhancing overall volume and movement.
Maintenance and Care Tips
Proper maintenance is critical for prolonging the life of Genius Wefts:
- Schedule maintenance every 6–8 weeks to adjust wefts and prevent strain.
- Use sulfate-free, alcohol-free shampoo and conditioner.
- Minimize heat styling and always use thermal protection.
- Sleep with hair braided or under a silk bonnet to avoid tangling.
- Brush extensions gently from ends to roots using a loop brush.
Following these tips will help you keep your extensions looking healthy, natural, and long-lasting.

Common Questions About Genius Wefts
- Can Genius Wefts be cut? Yes, they can be trimmed anywhere along the weft without fraying.
- Are they suitable for fine hair? Absolutely. Their lightweight design makes them perfect for delicate hair.
- Can they be used on short hair? Yes, but layering may be needed for a seamless blend.
- How long do they last? With proper care, full cuticle Genius Wefts can be reused 4–6 times over 12 months.
- Are Genius Wefts comfortable to wear?
With no return hair and a thin, flat weft design, Genius Wefts lie comfortably against the scalp, even during extended wear or physical activity.
Schlussfolgerung
Installation von Genius Weft hair extensions can transform thin, flat, or short hair into a natural, voluminous, and long-lasting hairstyle. Whether you use the beaded sew-in method, Mikroperlen, or tape-ins, proper preparation, careful placement, and expert blending are key to achieving a flawless result.
By following this step-by-step guide, you’ll be able to install extensions confidently and provide professional-quality results that your clients—or your own hair—will love. For more tips, tutorials, and product recommendations, explore our resources and elevate your hair extension skills today.